|
AudioTX
Communicator Manual
2.
Using AudioTX Communicator
2.1 ISDN connections
- General
information
- Phonebook
entries
-
Making and receiving ISDN calls
2.2 Network connections
- General
information
- Phonebook
entries
-
Making and receiving network connections
2.3 Internet & public network connections
- Bandwidth
considerations
-
Connecting through a proxy server or firewall
Back to
index page  
| 2.
Using AudioTX Communicator |
AudioTX Communicator connects to all of the
other main ISDN codecs available on the market today. Communicator's
unique adaptive auto-connect technology means that these connections
are simple and trouble-free.
The first stage in dialling a connection is
to create a phonebook entry. This stores the phone numbers
and settings used together under a unique name that you provide
for the connection. Any of the phonebook entries in your list
can be dialled by simply selecting the entry and clicking
on 'Dial'.
You'll find this process so simple that you
won't really need to refer to these instructions, but here's
a step-by-step guide to walk you through your first connection.
First: Click on the 'Add' button to the right
of the main screen. The 'Add new phonebook entry' window appears:
 |
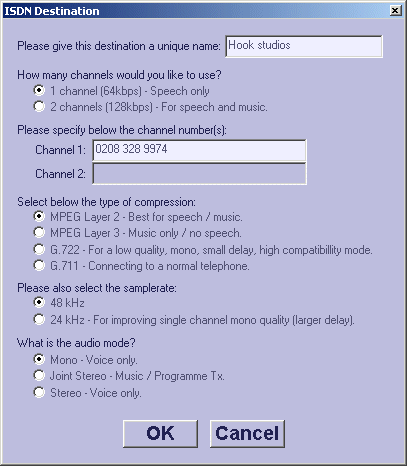
Connection
Name
First type a name for your new entry - this will
be the name shown in your phonebook.
Number
of Channels & Phone numbers
Select the number of channels for this connection
(64 or 128kbits) and enter the phone numbers.
If
you are using 2 channels and leave the second number
box blank, AudioTX copies the number from the first
box when you click OK.
|
|
Type
of compression, samplerate and audio mode
Choose from MPEG Layer II, MPEG layer III and G.722
coding depending on the codec you are connecting to
and the mode it is expecting. G.711 is a special case
and can be used to call into a normal analog telephone
(like a telebalance unit).
Sample
Rate: 48kHz is the normal setting, though using
24kHz provides better quality on MPEG2 at 64kbits (1
channel).
Audio
mode: the best options are normally Mono or Joint-Stereo
- If you only need Mono, you'll find that selecting
a stereo mode will reduce your audio quality as both
codecs have to code for stereo and this wastes the available
space on the link.
|
Saving
the entry
When you have finished, click OK to save the entry and
return to the main window.
|
Making
and receiving ISDN calls
Make sure
that your new entry is highlighted and click on the 'Dial'
button at the bottom right of the main window. Watch the connection
box at the top left of the screen and the status bar at the
very bottom to see your connection progress. You should see
the following sequence in the status bar and appropriate changes
to the Connection box:
Connecting
to: (ISDN) 1234 5678 (the ISDN number)
Connected to: (ISDN) 1234 5678
Within
a few seconds of this sequence, you should see information
in the 'Receiving' and 'Transmitting' sections of the Connection
box.
The final
stage is that the peak meters start moving (or the bottom
green LED lights on each if there is no audio being sent ot
received.)
Incoming
calls are automatically accepted and auto-detected. You can
modify this behaviour using the Answer Settings window discussed
in section 3.
...Top of section  ...Back
to index page ...Back
to index page 
| 2.2
Network (IP) Connections |
AudioTX
Communicator is able to send and receive live audio over IP
networks. Depending on the network bandwidth available, you
can use MPEG2, MPEG 3 coding up to maximum bitrates of 384
kbits and 320 kbits respectively. You can also send and receive
UNCOMPRESSED (Linear PCM) audio. A 48kHz sampled stereo signal
(above CD quality) requires 1.5Mbits - which is quite possible
on most company networks.
This
includes the following:
A
standard office or company-wide PC CAT5 network, either 10
or 100Mbits
Leased line connections
ADSL, DSL and cable-modem links
Satellite links
ATM networks
The
PCs running communicator at each end can have a standard Ethernet
network card installed, or may have different larger-scale
networking hardware (say an ATM or Gigabit Ethernet card)...
both options are fine. As long as the network is available
to the Windows operating system, AudioTX recognises it and
will allow connections.
Communicator
has three distinct network modes, which are explained in more
detail below. Each has a different degree of safety margin
built in to deal with any holdups in sending or receiving
audio across the network:
Local
network
(dedicated or low use) |
In
this mode, a minimal safety margin is applied giving a
very short transmission delay over most networks. Typically
you should try this setting first for all private networks. |
| Local
network |
An
extra safety margin of 100 to 200mS is added to cover
any small glitches in network performance. |
| Internet/Very
busy network |
Before
a connection is established, Communicator conducts tests
of the network which take 5-10 seconds and decides on
a safety margin of 0.5 to 2 seconds which it then applies
to your connection. |
Connections
over public networks (e.g. Internet) are discussed in more
detail in the next part of this section.
Each of
these settings should be used for guidance only. For example,
you may decide to use the middle setting even on a well-managed
private network if you are carrying a live transmission. You
may be able to use the middle or even the lowest setting on
your internet connection if your provider happens to have
a very clean route to your chosen destination.
As
with ISDN connections, the first stage in dialling a connection
is to create a phonebook entry. This stores the phone numbers
and settings used together under a unique name that you provide
for the connection. Any of the phonebook entries in your list
can be dialled by simply selecting the entry and clicking
on 'Dial'.
First:
Click on the 'Add' button to the right of the main screen.
The 'Add new phonebook entry' window appears:
 |
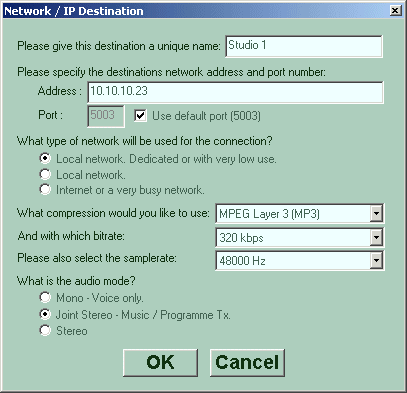
Connection
Name
First type a name for your new entry - this will
be the name shown in your phonebook.
Address
and port
You can enter an IP address or computer name or
FQDN (e.g. studio1.tx.radio.net) depending
on how your network is configured.
The
port number must be the same as you have set in the
answer settings of the AudioTX device you are calling.
5003 is used as the default.
|
|
Type
of compression, samplerate and audio mode
Choose from MPEG Layer II or MPEG layer III coding or
Uncompressed (linear) audio depending on the available
network bandwidth.
Sample
Rate: 48kHz is the normal setting, though using
24kHz provides better quality on low bitrate MPEG2 at
64kbits or less.
Audio
mode: For MPEG2 and MPEG3 at lower bitrates (<192)
use Mono or Joint-Stereo. For greater bitrates (and
always for linear) you can use Stereo coding which will
provide better audio quality at higher bitrates.
|
Saving
the entry
When you have finished, click OK to save the entry and
return to the main window.
|
Making
and receiving IP Network connections
Make sure
that your new entry is highlighted and click on the 'Connect'
button at the bottom right of the main window. Watch the connection
box at the top left of the screen and the status bar at the
very bottom to see your connection progress. You should see
the following sequence in the status bar and appropriate changes
to the Connection box:
Connecting
to: (IP) 10.10.10.23 (the name or IP address)
Connected to: (IP) Studio area A (the ID string set in global
settings at the remote end)
(In the case of a connection using the Internet/Busy network
option, you will first see the line tests in the status bar).
Within
a few seconds of this sequence, you should see information
in the 'Receiving' and 'Transmitting' sections of the Connection
box.
The status
bar then shows transmit and receive bitrates (together with
transmission performance percentages for Internet/Busy network
setting).
The final
stage is that the peak meters start moving (or the bottom
green LED lights on each if there is no audio being sent ot
received.)
...Top of section  ...Back
to index page ...Back
to index page 
| 2.3
Internet & public network connections |
As part of its IP Network transmission
capability, Communicator is able to establish live audio links
over the Internet - whether you have an ASDL connection, DSL,
Cable-Modem, Leased line, or other high speed connection.
In planning your use, you should
first check what the theoretically available bandwidth is
- for example, many European providers sell a 512kbits ASDL
or Cable modem product... however you may find that they only
provide that speed downstream (i.e. to you) and the upstream
speed (i.e. away from you) is 256kbits or even 128kbits. You
should also check what bandwidth you are also getting practically
in day to day useage of the link. There are many internet
sites and tools that can help you do this.
Typically Communicator will be
able to use a bitrate of between 10 and 20% less than this
maximum.
All you then need to do is to
establish the IP address of the remote PC running AudioTX
that you are connecting to and follow the standard instructions
for Network connections. The three different network modes
detailed in the table in section 2.2 are worth experimenting
with - depending on your needs, you may not need to use the
official 'Internet' mode and so may end up with a much shorter
delay in transmission.
If you do not have a fixed IP
as part of your service, again there are free programs which
will allow you to look this up each time you use the system.
You may find in the longer term that it's worth asking your
provider for a fixed IP address.
Connecting
through a proxy server or firewall
If your network has a proxy server
or firewall, you need to discuss this with your network administrator
in order to allow AudioTX Communicator to function correctly.
There are several possible options:
To
make outgoing calls:
- The
best option, if your firewall supports it is to use a SOCKS
proxy. You will need to talk to your network admin or IT
department about this. You will then also need a socks client
installed on your machine (see the list at the end of this
section).
- Open
a TCP bridge on port 5003 to allow you to make outgoing
connections to a particular destination PC and port. You
can of course use specify a different port number in the
phonebook entry as long as this matches with your firewall
settings and the port setup in the remote PC's Global Settings
Window (see section
3)
To
receive incoming connections:
- Open
a reverse TCP bridge on port 5003 (directed to the AudioTX
PC) to allow you to receive calls. You can of course set
a different port number in the Global Settings Window (see
section 3) as long as you tell people calling you what port
you are using.
- If
you have multiple AudioTX PC's behind your firewall, open
a new Reverse TCP Bridge mapping on a different port for
each and set the port in the Global Settings of each PC
to the correct port.
Suggested
SOCKS Proxy clients:
Hummingbird
Socks - (FREE) This adds SOCKS to all network activity
on your machine, though you can exclude certain ranges which
you tell the software belong to your internal network. All
other traffic is then directed via your SOCKS proxy server.
(Company home page: http://www.hummingbird.com).
SocksCap
- (FREE) This installs an 'application launcher' for programs
which need to channel network traffic through a SOCKS proxy.
(By NEC, Company home page: http://www.socks.nec.com)
eBorder
client - (Paid for but not expensive) The professional
version of NEC's SOCKS client which works in a similar way
to the Hummingbird product. (Company home page: http://www.eborder.nec.com)
...Top of section  ...Back
to index page ...Back
to index page 
|


![]()
![]()

