|
AudioTX
Communicator Manual
1.
Getting Started: The Basics
1.1 Installation
1.2 Quick Start
-
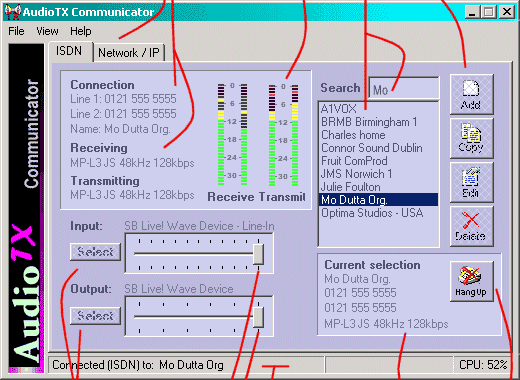
The main AudioTX Communicator window
-
Audio controls and the Windows mixer
-
Basic operation
-
File playback during live connections
1.3 Information on Communicator's intelligent
adaptive technology
Back to
index page  
| 1.
Getting Started: The Basics
|
Before
you start...
- AudioTX
Communicator runs on a Windows 98/NT/2000 PC with a standard
Soundcard.
- For
ISDN connections you will also need a CAPI 2.0 compatible
ISDN card
- For
Network connections, you will need a correctly installed
and configured network adapter and Windows networking setup.
- You
can find details of cards that we have tested and recommend
(together with a list of cards that you can buy from us)
in the 'Soundcard and ISDN
Card' section of this site.
- We
recommend a minimum PC specification of a Pentium II 300
machine and a PII 400 or above is ideal.
You should
setup and test your Sound Card & ISDN cards and/or Networking
setup if you haven't done so already before installing AudioTX
Communicator.
To start
the installation and setup process for the trial version of
Communicator, simply double-click on the AudioTXCommunicator.EXE
file that you downloaded from the web. Or insert the CD into
your PC and if the installation does not start automatically,
run the AudioTXCommunicator.EXE file from the CD. Follow the
onscreen instructions, reading the instructions given, until
installation is complete.
The software
has now been installed, and runs in trial mode until you purchase
either a software unlock key or a hardware dongle. Both of
these options are explained in section
4 of this manual.
When
first installed, Communicator runs in trial mode. This allows
you to try out the program. All functionality is as the full,
paid for version except:
- Connections
are disconnected in between 8 and 30 minutes (randomly)
- Communicator
'times out' one hour after you start - you can then restart
to continue testing
...Top of section  ...Back
to index page ...Back
to index page 
| 1.2
Quick Start: Main AudioTX Window |


...Top of section  ...Back
to index page ...Back
to index page 
Audio
controls and the Windows mixer
Before
making your first connection, you will need to tell AudioTX
Communicator which soundcard and inputs or outputs to use.
- Clicking
on the Input 'Select' button bringsup a list of available
soundcard(s) and their input channels (e.g. wave, mic, aux,
line, cd). On most cards, you will want to select the Mic
or Line input.
- Clicking
on the Output 'Select' button will bring up a list of the
soundcard(s) you have in your machine, and you should select
the correct (or only!) one.
Once
you have made these selections, you will be able to use the
sliders to adjust the input and output levels where your card
uses the windows mixer and just the output levels if not.
(Professional sound cards do not use the Windows mixer in
most cases).
Next,
if your soundcard uses the Windows mixer, you should check
the Windows mixer settings.
- In
the record settings, select only the input channel you want
to use and the main volume output (if present). On some
soundcards, this just means muting the unused inputs rather
than selecting the used ones.
- In
the playback settings, make sure that the Wave Out channel
and main volume (if present) are selected (or, as above,
simply mute the others if that's the way your soundcard
does it.)
Selecting
an soundcard input in Communicator (e.g. Line in) does not
automatically shut off any other inputs (e.g. cd, mic, aux)...
you'll probably want to do this once as detailed above in
the Windows Mixer and then leave alone.
Similarly,
you may want to mute all outputs in your Windows mixer other
than Wave Out (and the main volume).
...Top of section  ...Back
to index page ...Back
to index page 
Basic
Operation
You
should now be ready to place and receive ISDN and Network
calls using AudioTX Communicator.
Most
of Communicator is fairly simple to use - it's designed to
be as simple as possible and work in an intuitive way.
- Outgoing
connection details are entered once into the ISDN or Network
phonebook and you then simply select your entry and click
on the 'Dial' button.
- Incoming
connections are, by default, automatically answered on either
ISDN or Network.
There's
more information on phonebook entries and dialling in section
2 of this manual and on answer settings in section
3.
...Top of section  ...Back
to index page ...Back
to index page 
File
Playback during live connections
Open
up the audio library - by clicking on the 'File Playback'
menu bar. You can now add WAV files to AudioTX's audio library
before dialling your connection. The files in your audio library
can be placed in the desired order simply by dragging them
to the new position in the list.
You
can playback these items at any time during a live connection
by highlighting the correct item and clicking on the Play
button in the audio library window. The live input (say your
microphone) is automatically muted during playback.
Playback
can be stopped or paused at any time. When playback stops
at the end of a file, the next item in the list is automatically
highlighted - cued ready for playback. At any time, you can
click on another file in the list and that item will be cued
for playback next.
...Top of section  ...Back
to index page ...Back
to index page 
| 1.3
Standard behaviour & adaptive technology |
ISDN
compatibilty issues are legendary! Communicator helps overcome
these by detecting the type of unit at the remote end and
helpfully reconfiguring to provide maximum compatibility.
In most cases and with frequently encountered devices, e.g.
CDQ Prima, Telos Zephyr, Glensound etc, this is done transparently.
In
addition to this, and to make life easier, AudioTX Communicator
has a level of intelligence built in that's well above what
you will have been used to with other codecs.
- When
a call comes in over ISDN or Network, Communicator automatically
detects the type of coding - e.g. MPEG2, MPEG3, G.722, Mono,
Joint-Stereo, Sample Rate etc - and sends a return using
exactly the same settings. (This behaviour can be overridden
using the answer settings - see section
3)
- At
all times, the decoder (your receiver) will continue to
detect the incoming type - so if the remote end changes
its mind, AudioTX will adapt and continue to decode (play)
the audio received. This also means that if the remote system
is set for, say, a Joint-Stereo MPEG2 connection and you
dial a Mono connection, AudioTX will send JS as requested,
but will still decode the Mono audio being received from
the remote device. This is often intentional rather than
accidental and known as a dual-coded connection. Dual-coded
connections for incoming calls are defined in the answer
settings - see section
3)
...Top of section  ...Back
to index page ...Back
to index page 
|


![]()
![]()


